Security and Tokens - Authentication
Using the Ultra Extension Framework (UEF) is a powerful way to enhance the way students learn and teachers teach. The framework itself is pretty easy to use. As with most integration types, the biggest hurdle is figuring out the proper method of authenticating your tool and authorizing its use. The purpose of this document is to shed some light on this process in the hopes that it will help you get building your code faster.
This document makes a few assumptions.
We assume you have:
- Registered your application on the developer portal
- Authorized your application (LTI and REST) on the Learn instance in question
We won’t go into this too much in this document as this is covered elsewhere. If you need more information, click the links above to read through those processes. There are a couple of things to keep in mind, however. When registering your application in the developer portal, if you plan to use LTI 1.3, you will register that at the same time. In addition, when you authorize your application in your Learn instance, you will need to set End User Access to ‘Yes’ and Allow application to Act as User to ‘Yes’. And when you register your LTI application, you will need to click the context menu next to the domain and click Manage Placements. You will need to create a placement and be sure to select Ultra Extension as the placement type.
Before we get started, we also need to keep in mind that your Ultra Extension will run in an iframe. As such, any cookies your application relies on will need to be set with SameSite=None and Secure=True. If you do not do this, most modern browsers will block these cookies, causing your application to fail. You can read more information on SameSite cookies here
How Authentication/Authorization Works
Ok, now that we have talked through the prerequisites and iframe/cookie connection, we are ready to get started. At its most basic, authenticating and authorizing your Ultra Extension is fairly straightforward. Everything starts when a user logs in to Blackboard Learn.
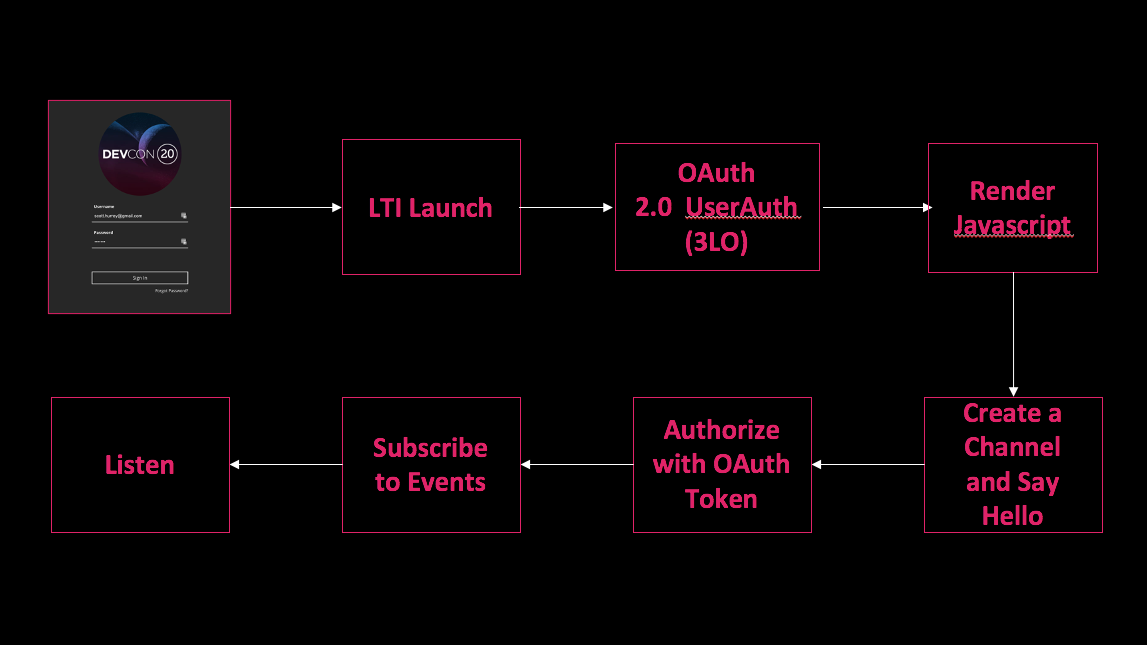
At login, Ultra looks for Ultra Extension placements. When it finds one, a Learning Tools Interoperability (LTI) launch takes place. UEF can support either LTI 1.1 or 1.3 launches. LTI 1.3 is the preferred method. Once the LTI handshake is complete, your app must then initiate a Learn REST token retrieval. Important to note, this must be a done with the Authorization Code workflow. UEF runs at login on behalf of a specific user, and as such, the REST token must also act on behalf of that user. We will talk more about that in a bit. Once the token is obtained, your application will render javascript, which now lives in a hidden iframe in Ultra. You Javascript can then attach to a message channel and being talking with Ultra!
LTI Launches
LTI is a powerful mechanism for allowing a trusted launch with context from one system to another. LTI 1.3 gives you access to the most secure method possible, and it is for this reason that we consider this a best-practice for UEF. Bear in mind, that because it is more secure, it is also a bit more complicated. The basic workflow can be summed up in a few steps:
- The user logs in
- UEF issues a GET to your login URL with query parameters that include information like the issuer and the target link url
- Your tool redirects the launch to the developer portal to perform the OIDC login
- Upon success, Learn issues a GET to your launch URL with the JWT containing the contextual information
- Your application verifies the signature using the public/private key set
- Your application does what it does best
If you want an excellent overview of this process, you can check out this youtube video by Claude Vervoort.
Adding OAuth 2.0 Authorization Code Flow
Authorization Code token management is a standard way of authenticating against REST APIs across the web. For Blackboard, we have this documented ««link»» here. This is a little tricky when combining with LTI for the purposes of UEF. Let’s look at an updated version of the steps listed above to highlight how this is done with regards to UEF specifically.
- The user logs in
- UEF issues a GET to your login URL with query parameters that include information like the issuer and the target link url
- Your tool redirects the launch to the developer portal to perform the OIDC login
- Upon success, Learn issues a GET to your launch URL with the JWT containing the contextual information
- Your application verifies the signature using the public/private key set
- Your application redirects to the /learn/api/public/v1/oauth2/authorizationcode endpoint (important note below)
- Learn sends your application an authorization code, which your application must use to request a token from /learn/api/public/v1/oauth2/token endpoint
- Your application then tells your UEF javascript what this token Id is
- Your application renders that javascript in the Ultra iframe.
- Your application does what it does best
NOTE: It is important to note that in the next step, we will talk about how to authorize your javascript to talk to UEF’s message channel. This process requires scopes, and these scopes are set when you request your access code. If you do not request the appropriate scopes in this step, the next step WILL NOT WORK. For all scopes, just set scope=”*”.
This table lists all of the available scopes and what you might need them for.
| Scope name | Syntax | Associated Events |
|---|---|---|
| ALL_AUTH_TYPE | * | Gives all scopes |
| ANALYTICS_AUTH_TYPE | “ultra:analytics-event” | click,hover |
| HELP_PROVIDER_TYPE | “ultra:help” | help:register |
| PORTAL_AUTH_TYPE | “ultra:portal” | portal:new,portal:remove |
| PORTAL_MODAL_AUTH_TYPE | “ultra:modal” | portal:modal |
| PORTAL_NOTIFICATION_AUTH_TYPE | “ultra:notification” | portal:notification |
| ROUTE_AUTH_TYPE | “ultra:route-event” | route,route:changing |
Authorizing Your Javascript
Once your javascript is rendered in the UEF, you must connect to a message channel to receive and send events to Ultra.
The first step is to set up a window.postMessage listener for the integration handshake and send an integration:hello message:
console.log("addEventListener");
window.addEventListener("message", onPostMessageReceived, false);

console.log("say hello to " + integrationHost);
window.parent.postMessage(
  { type: "integration:hello" },
  integrationHost + "/*"
);
In most cases, the integrationHost variable will be set to your Learn domain, for example: integrationHost = ‘https://ultra.myschool.edu’;.
At this point, Ultra will respond with an event of type integration:hello back. This message will contain a port number that you then attach to for communication and send an authorization request including your OAuth 2.0 token retrieved above:
function onPostMessageReceived(evt) {
  // Do some basic message validation.
  const fromTrustedHost =
    evt.origin === window.__lmsHost || evt.origin === integrationHost;

  if (!fromTrustedHost || !evt.data || !evt.data.type) {
    return;
  }

  // (2) A majority of the communication between the integration and Learn
  // Ultra will be over a "secure" MessageChannel.
  // As response to the integration handshake, Learn Ultra will send a
  // MessageChannel port to the integration.
  if (evt.data.type === "integration:hello") {
    // Store the MessageChannel port for future use
    messageChannel = new LoggedMessageChannel(evt.ports[0]);
    messageChannel.onmessage = onMessageFromUltra;

    // (3) Now, we need to authorize with Learn Ultra using the OAuth2 token
    // that the server negotiated for us
    messageChannel.postMessage({
      type: "authorization:authorize",

      // Your OAuth 2.0 REST token
      token: token,
    });
  }
}
Remember when we talked about scopes? This is where they come into play. You are passing that REST token and requesting authorization. This step attaches those scope requests to your integration.
Ultra will respond and tell you either your are authorized or you are not. Upon receipt of a successful authorization, we will need to subscribe to the event types we want to listen to.
  function onMessageFromUltra(message) {
    // (4) If our authorization token was valid, Learn Ultra will send us a
    // response, notifying us that the authorization
    // was successful
    if (message.data.type === 'authorization:authorize') {
      onAuthorizedWithUltra();
    }

    // All of your other events are processed here
  }

  function onAuthorizedWithUltra() {
    console.log('Authorization was successful');

    // (5) Once we are authorized, we can subscribe to events, such as telemetry
    // events
    messageChannel.postMessage({
      type: 'event:subscribe',
      subscriptions: ['click','route','route:changing','portal:new','portal:remove'],
    });
Assuming the scopes provided allow you access to the events you are subscribing to, you are off and running!
Tips and Tricks
The best tip we can give is that all of the communication happens in the browser, so if you are having trouble with the javascript, using console.log() will print messages to the javascript console in the Chrome or Firefox developer tools. In addition, you can click things in the Ultra UI and see interactions in the Network tab of those same developer tools. This helps you identify the routeName for route events or the analyticsId in click events. These are how your application knows where they user is and what they are doing so you can insert your functionality in the right place.