Three-Legged OAuth
One of the drawbacks associated with Basic Authentication is that the application requires broad access, as the tool is acting as a system-level user and enacting for the user. Three-legged OAuth (3LO) allows an application to act as a user. This sounds scary, but it actually allows for much more granular access control. Rather than a system user acting as someone that can modify all courses, the application is now acting as Professor X, and as such, only has access to his or her courses.
As of Blackboard Learn 3200.7 (SaaS deployed release), third-party REST applications now have the ability to implement 3LO to authorize a user against the APIs and act as that user. In the spirit of sharing pretty pictures, here is a nice diagram displaying the workflow:
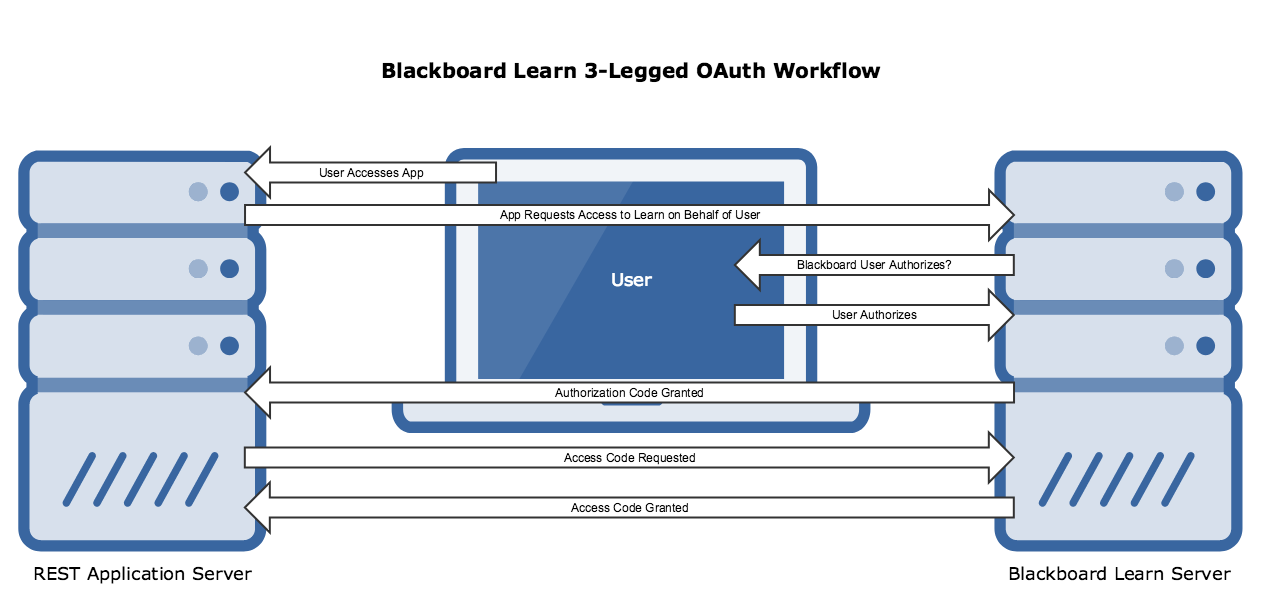
So let’s talk a bit about what is happening here. Let’s pretend that we have
built a mobile app that allows a student to get his or her grades. Today, we
will be Marlee. Marlee picks up her iPhone and opens the GetMyGrades app. The
first time Marlee opens the app, the app will send a GET request to
/learn/api/public/v1/oauth2/authorizationcode with the Content-Type set to
form/urlencoded and the following data as query parameters:
| Parameter | Definition | Example |
|---|---|---|
| redirect_uri | Where to redirect the user once they have authorized the application | redirect_uri=https://my.edu/authorized |
| response_type | Must be set to code. Tells the endpoint to return an authorization code | response_type=code |
| client_id | The application’s OAuth key, from the key/secret pair as registered in the developer portal. NOTE: This is NOT the Application ID!! |
client_id=8DBBA050-B830-414F-B7F1-0B448A6320C9 |
| scope | The application’s permissions: read, write, delete, and/or offline. Offline is required to use Refresh Tokens CAUTION: If you do not set the scope appropriately you will still be able to get an access_token, but when using the access_token you will not be able to GET, POST, or UPDATE as expected. Instead you will get error responses. |
scope=read |
| state | Opaque value used to prevent Cross Site Request Forgery | state=DC1067EE-63B9-40FE-A0AD-B9AC069BF4B0 |
So in this example, my request would look like:
GET /learn/api/public/v1/oauth2/authorizationcode?redirect_uri =
https://my.edu/authorized&response_type=code&client_id=8DBBA050-B830-414F-B7F1-0B448A6320C9&scope=read&
state=DC1067EE-63B9-40FE-A0AD-B9AC069BF4B0
The result of this action is that Marlee is presented with her school’s Blackboard Learn login screen. She logs in and is presented with the following screen, asking her to authorize the application.
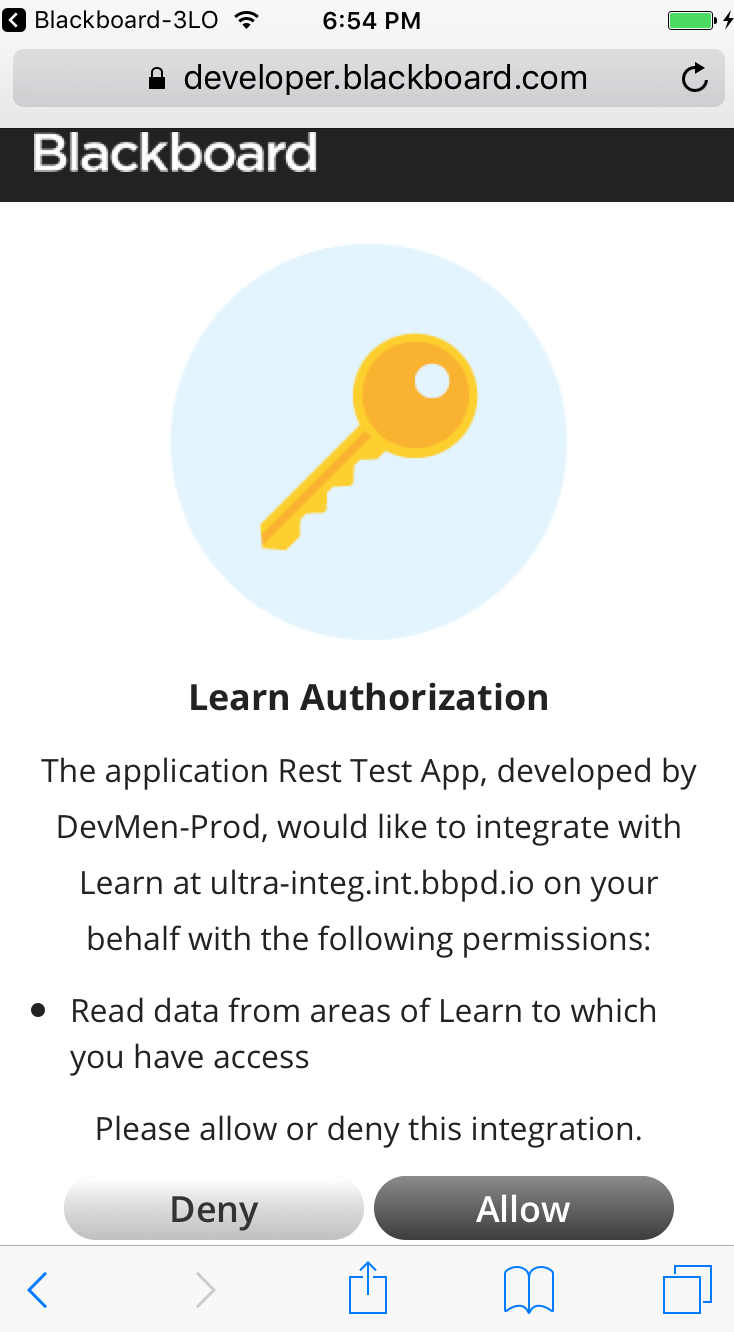
Once Marlee clicks ‘Allow’, the URL sent as the redirect uri is called with the authorization code as a query parameter, for example:
https://my.edu/authorized?code=1234567890
Now the application is able to talk server-to-server as Marlee. The next step
is to get an access token from Learn based on the authorization code Marlee
granted. From here the workflow is very similar to the Basic Authentication
method. The token is requested as a POST request from
/learn/api/public/v1/oauth2/token. This is also a form/urlencoded. The body of
the request contains the text grant_type=authorization_code, and the URL is
parameterized with the code code=1234567890 and the redirect_uri
redirect_uri=https://my.edu/app. So the request looks like:
POST /learn/api/public/v1/oauth2/token?code=1234567890&redirect_uri=https://my.edu/app
The endpoint responds with the standard token (access_token, expires_in, and token_type), but also has a couple of new fields. If offline mode is granted, a refresh_token is returned. This allows the application to get a new token on behalf of the user, even if that user isn’t explicitly asking for it. In addition, the scope requested in the initial request is returned, as well as the UUID for the user in the user_id field.
From this point forward, the access_token is used just as it is when using Basic Authentication, but instead of acting as the system user, it is acting as Marlee.
Refresh Tokens
As mentioned above, one of the available scopes that an application can request is offline. Essentially, the offline scope allows an application to access Blackboard Learn as a user without requiring the user to login each time. This might be especially useful in a mobile application to prevent the unnecessary redirects each time an application is loaded. The way this works is through the use of refresh tokens.
The first time a user accesses the application and the normal 3LO process takes place. The user is redirected to Blackboard, they login and authorize, and then the application is off an running. The difference is that a refresh token is returned in addition to the Bearer token. From this point forward, the third party application can automatically request a new bearer token by sending the request with the refresh token without involving the user at all.
The HTTP message might look like this:
POST /learn/api/public/v1/oauth2/token?refresh_token=8DBBA050-B830-414F-B7F1-0B448A6320C9&redirect_uri=https://my.edu/app
From this point forward, the access_token is used just as it is when using Basic Authentication, but instead of acting as the system user, it is acting as Marlee.
Use Proof Key for Code Exchange (PKCE) with 3-Legged OAuth 2.0
Starting in version 3700.4, Blackboard Learn’s 3-Legged OAuth 2.0 implementation supports the Proof Key for Code Exchange (PKCE) extension. For more information about PKCE, see OAuth 2.0’s RFC 7636: Proof Key for Code Exchange.
To implement the PKCE extension:
-
Create a random string 43-128 characters long, containing only the characters A-Z, a-z, 0-9, or the following - . _ ~ (hyphen, period, underscore, and tilde). This sting will later be used as your code_verifier.
-
Use the S256 hashing method to create a hash of your random string. This hash is your code_challenge. The formula for an S256 hash is based on the SHA-256, but is not exactly the same.
code_challenge = BASE64URL_ENCODE( SHA256( ASCII( code_verifier )))
For more information about the S256 hashing algorithm, see RFC 7636 - Proof Key for Code Exchange by OAuth Public Clients.
- Make a request to
/learn/api/public/v1/oauth2/authorizationcode, and provide acode_challengeandcode_challenge_methodin the query parameters. Forcode_challenge_method, the endpoint accepts onlyS256. Your request will look something like:
POST learn/api/public/v1/oauth2/authorizationcode?client_id=YOUR_CLIENT_ID&response_type=code&redirect_url=YOUR_URL&code_challenge=YOUR_CODE_CHALLENGE&code_challenge_method=S256
- Make a request for an access token, as normal. When you do, include your code_verifier as a query parameter. Your request will look like:
POST learn/api/public/v1/oauth2/token?grant_type=authorization_code&code=CODE_FROM_AUTH_CALL&code_verifier=YOUR_CODE_VERIFIER
The Learn server will verify that the code_challenge and code_challenge_method sent in the first request form a valid hash of code_verifier. This allows to the server to verify that the client asking for the access token is the same client that sent the authorization code request.
- When you receive an access token, you can use it as you normally would to make API calls.