Integrate Ally as a Service into your own user interface
The UI API is a specification for HTML attributes that can be used to introduce consistent patterns of Ally functionality.
Set-up
The latest UI API is readily available from your regionial Ally deployment:
<script src="https://prod-eu-central-1.ally.ac/integration/api/ally.ui.js"></script>
Configuration
Before any interaction logic can be applied, the UI API needs to be initialized.
// Wait until the Ally UI API has bootstrapped itself, this is usually a matter of milliseconds after loading
ally.ready(function () {
  // Configure the Ally UI API and store it on the `ui` instance variable on the window.
  window.ui = ally.ui({
    client: {
      // An authentication function that returns a suitable JWT token.
      // The function will be invoked each time the UI API needs to make an authenticated call to the Ally API.
      // When Ally needs to interact with a piece of content, the content hash id will be passed in. You can use
      // this to provide a token that is scoped to just that resource ID and/or apply your own rate limit.
      // When API calls are made that aren't specific to a content hash (e.g. determining custom help content),
      // no argument will be provided and a generic token can be returned.
      auth: (hashId) => Promise.resolve({ bearer: "eyJhbGciO..." }),

      // The base URL of your regional Ally API
      baseUrl: "https://prod-eu-central-1.ally.ac",

      // Your numerical Ally client identifier
      clientId: 42,
    },

    // The locale controls the internationalization and localization of the dialog
    locale: "en-US",

    // The Ally UI API currently requires this to be set to AaaS
    platformName: "AaaS",
  });
});
Once the UI object has been created, you can then use it to bind click handlers into your own DOM. You should run this function once the elements that you want to trigger Ally functionality are available in the DOM.
// Optional element to scan, defaults to the `body` element.
const el = document.getElementById("links");

// Check all the elements under #links and bind the necessary event listeners.
window.ui.update(el);
There is also an option to let the Ally UI API monitor the DOM and invoke the update method every x milliseconds. This is intended for when you have a dynamic web application where the DOM is actively changed as the user interacts with the page. e.g. single page applications, pop-out menus, etc..
// Scan the entire DOM
window.ui.autoUpdate({
  // Represents the millisecond interval at which to automatically update the DOM. If a number `> 0` is specified,
  // the DOM will be checked at this frequency. Otherwise, the DOM will be checked only once.
  // Optional.
  domWatch: 500,

  // The element whose subtree to scan for relevant data attributes.
  // Optional, defaults to the `body` element
  el: document.getElementById("links"),
});
Data attributes
The Ally UI API works by placing HTML data-* attributes in the DOM. The following generic attributes can be considered:
- data-ally-content-id - A unique identifier within the DOM tree for a content item. This can be referred to by other elements through data-ally-content-ref. This referral mechanism allows you to define the Ally content hash for a resource once and then refer to it from multiple places. Each element that has a content-id attribute, should also have a data-ally-aaas-content-hash attribute.
<a data-ally-content-id="123" data-ally-aaas-content-hash="MIja..." href="/download?id=987" > Download the original file </a> - data-ally-aaas-content-hash - The content hash that is returned by the Ally as a Service REST API.
- data-ally-content-ref - Can be used to refer back to the element that holds the data-ally-aaas-content-hash value.
- data-ally-download-url - The URL where a file can be downloaded from. This will be used to generate on-the-fly formats or feedback.
- data-ally-show - Whether or not the Ally UI API should show this element based on the value.
<a data-ally-content-ref="123" data-ally-show="alternativeformats"> This link is only visible when there are alternative formats available for this content item </a> - data-ally-show-display - The value of this attribute defines what display style should be used when showing an element.
<a data-ally-content-ref="123" data-ally-show="alternativeformats" data-ally-show-display="inline" > This link is only visible when there are alternative formats available for this content item </a> - data-ally-tooltip - Displays the contents of the
titleattribute in a tooltip when the element is hovered over. - data-ally-invoke - Binds a click handler to the element and invokes the specified functionality when clicked.
Alternative formats
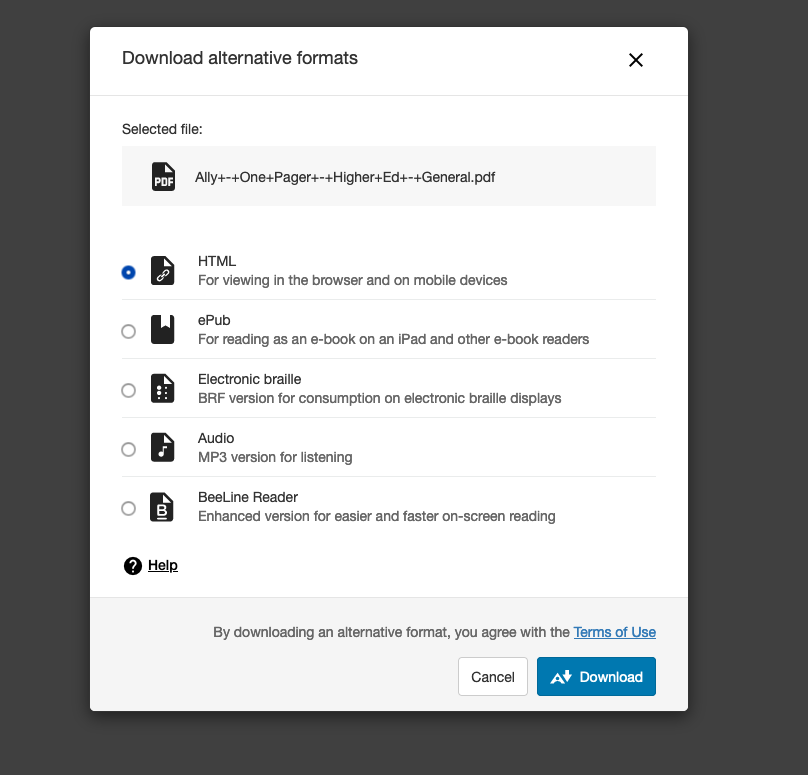
When you want to offer alternative formats to your users, it’s recommended to rely on Ally’s UI API as it is able to communicate all the intermediate states before a format can be downloaded. The Alternative Formats modal can be launched from any web application and does not come with any Blackboard Branding.

Example
The following example contains two links. The first link is a download link your application might already make available to your users. This element should be annotated with the relevant Ally information (aaas-content-hash and download-url) and a content-id so that it can be referred to by the second link which will trigger the alternative formats modal.
<a
  href="/download/12312123"
  data-ally-content-id="myAllyContentId1"
  data-ally-aaas-content-hash="QWxseSstK09uZStQYWdlcistK0hpZ2hlcitFZCstK0dlbmVyYWwucGRmOjM0QURFNDE2NzNDRUJBNUIyRjc2MDI3N0IxOEYwNTdERDY1MDczQzg6YXBwbGljYXRpb24vcGRm"
  data-ally-download-url="https://ally-public.s3-us-west-2.amazonaws.com/demo/High+Quality+Alternative+Formats/Ally+-+One+Pager+-+Higher+Ed+-+General.pdf"
>
  Original file
</a>
<a
  href="#"
  title="Alternative formats"
  data-ally-content-ref="myAllyContentId1"
  data-ally-invoke="alternativeformats"
  data-ally-show="alternativeformats"
  data-ally-show-display="inline"
  data-ally-tooltip
>
  <img
    src="/assets/img/ally-logo.svg"
    alt="Alternative Formats"
    width="25"
    height="20"
  />
</a>
