Ultra Extension Framework (UEF) Documentation
Table of Contents
- Getting Started
- Example Setup
- Integration Workflow
- OAuth and LTI Workflow
- Message Channels
- Portal Workflow
Getting Started
First, an application must be registered in DevPortal.
After completing the registration process, the following steps are needed to set up the extension framework in Ultra:
- Navigate to the Admin Panel and select LTI Tool Providers
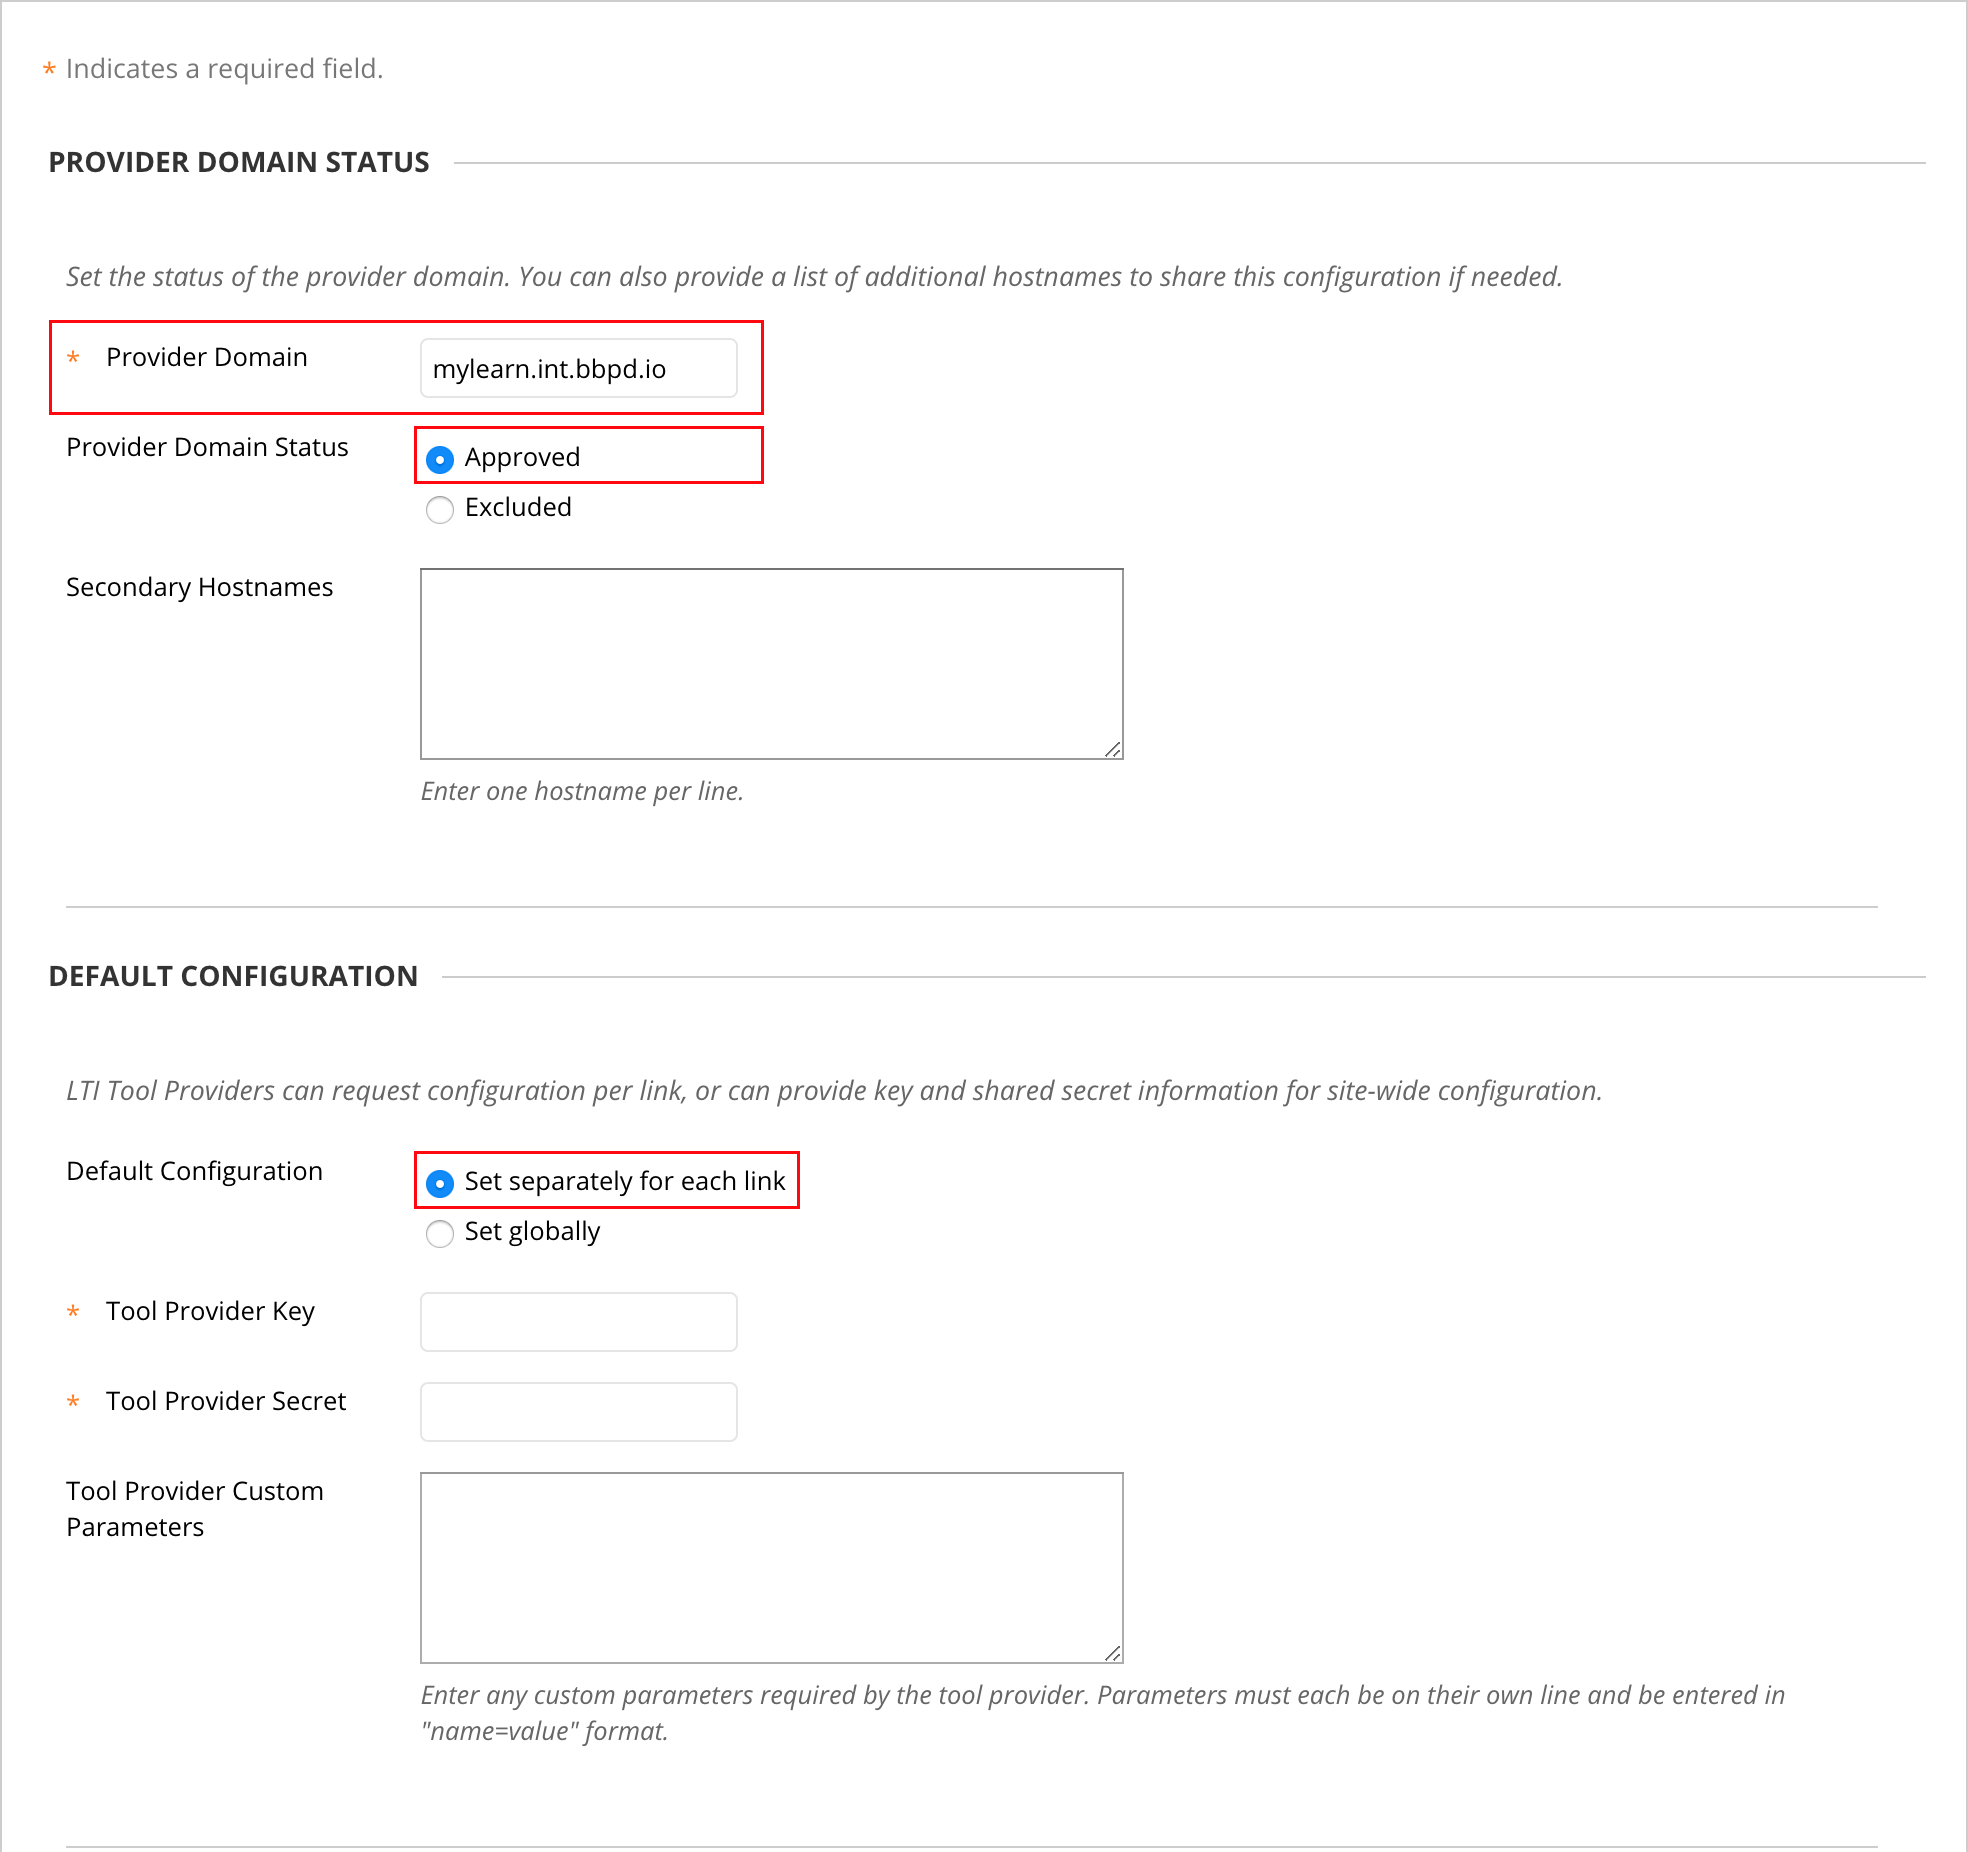
- Click on Register Provider Domain
- Add your Provider Domain and ensure that the Default Configuration is Set separately for each link
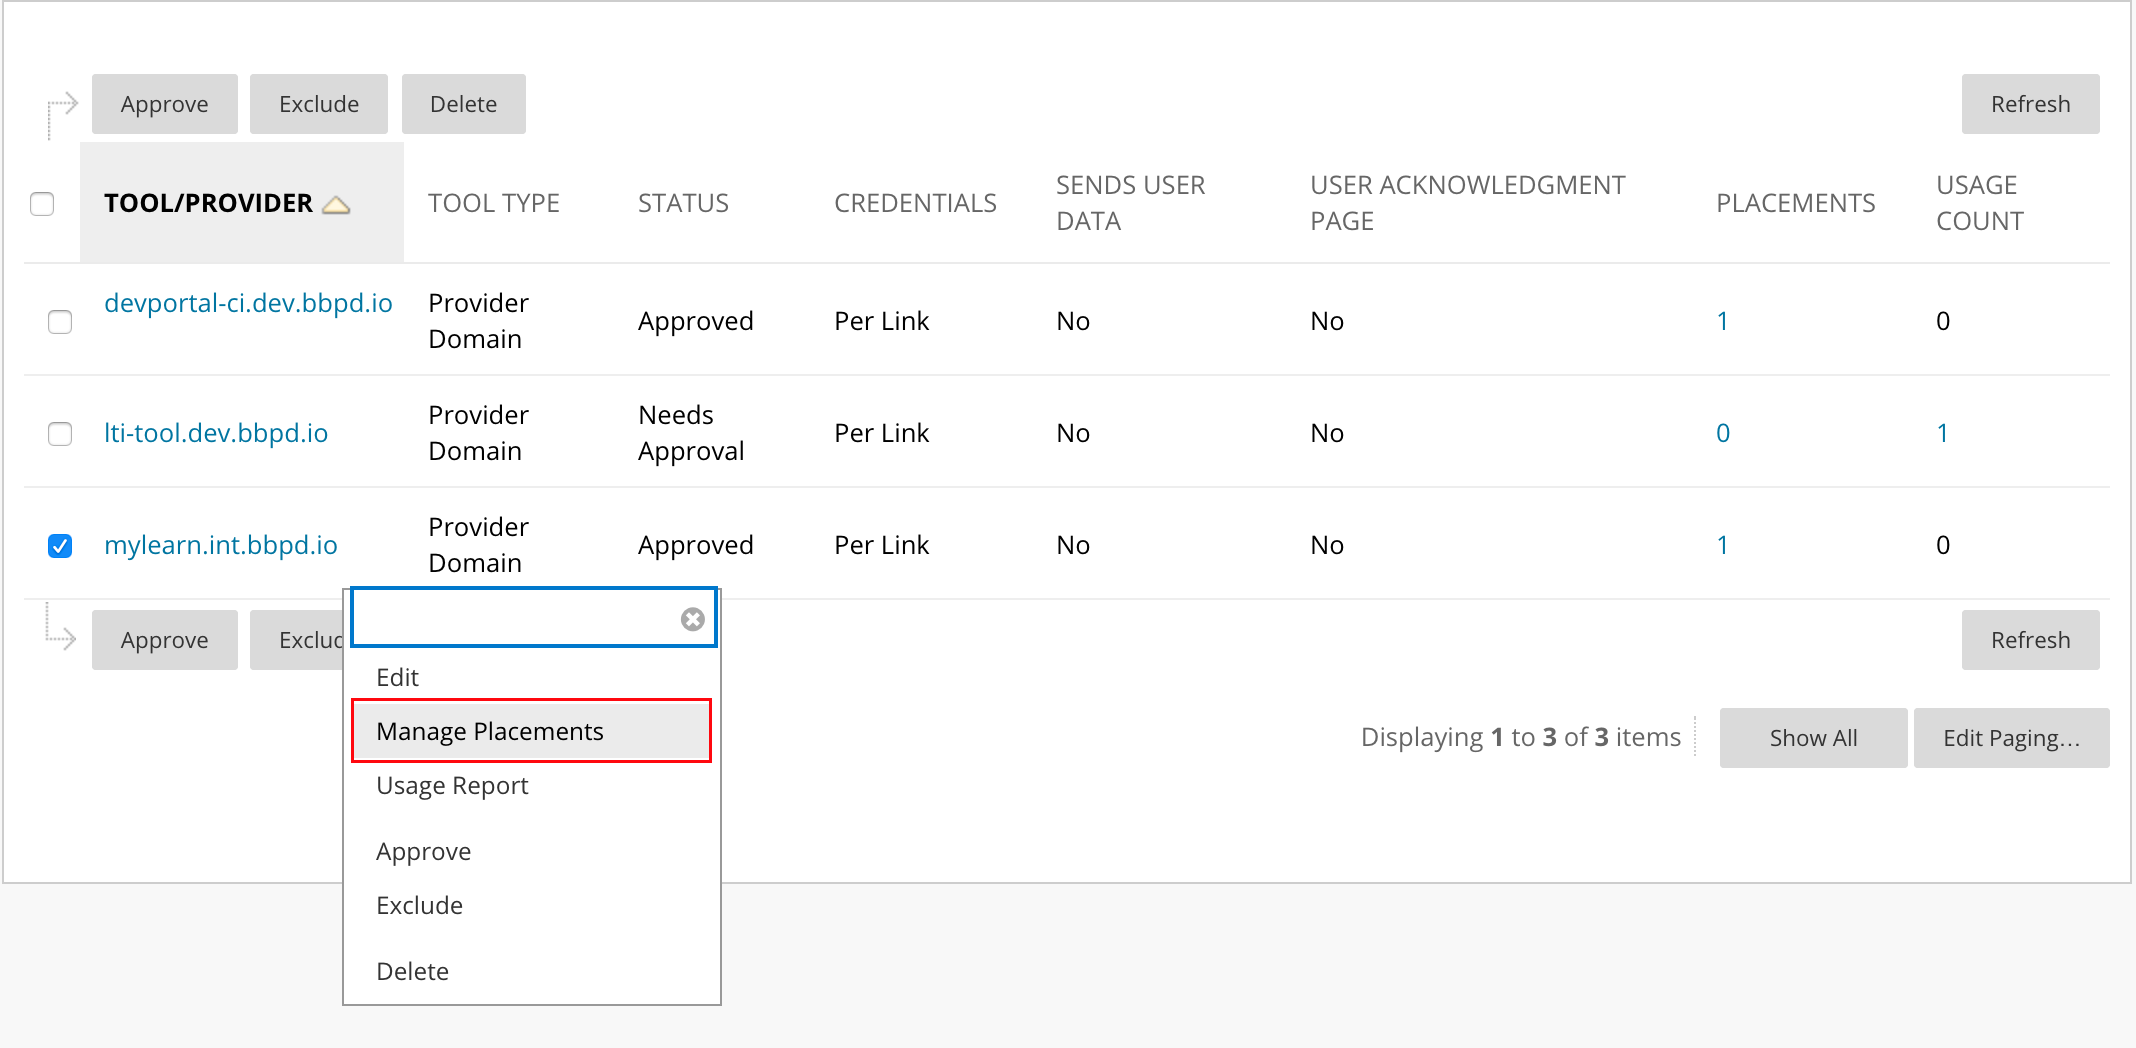
- Once saved, open up options for the provider you just created and select Manage Placements
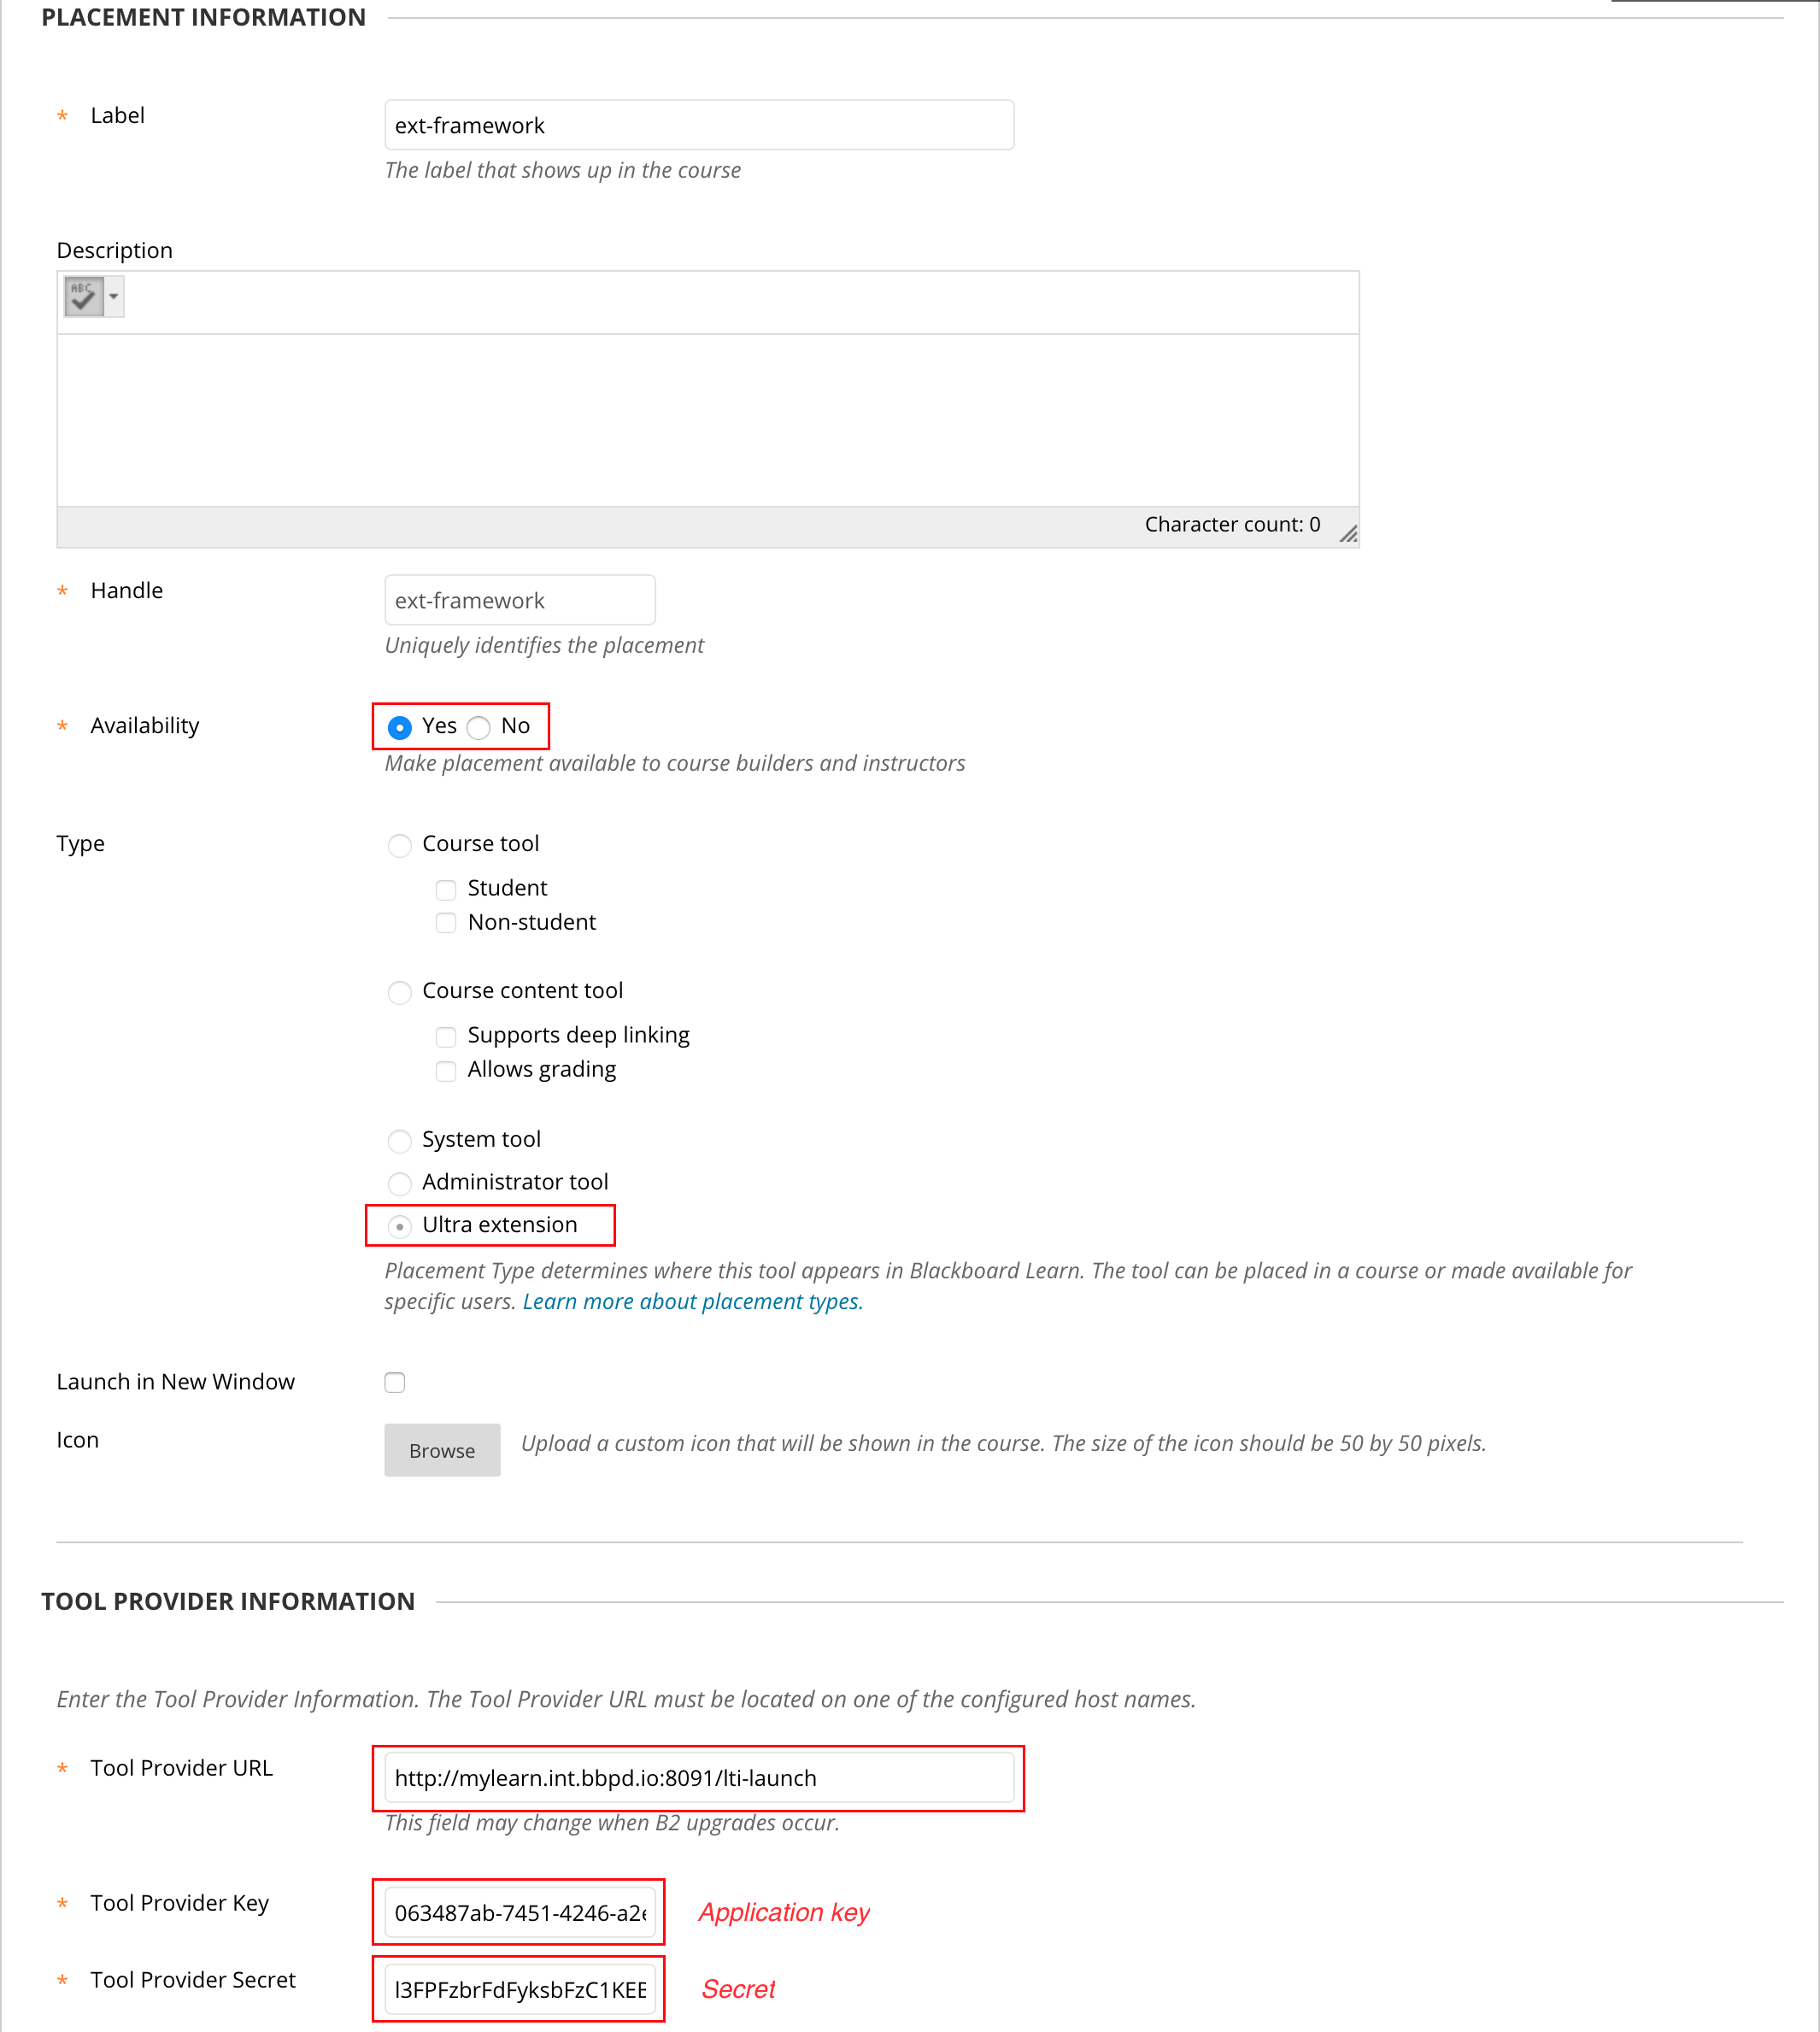
- For the placement you'll need the following information:
- Handle and Label can be anything
- Availability: Yes
- Type: Ultra extension
- Tool Provider URL: is your specific provider's url
- The Tool Provider Key and Tool Provider Secret are the same values used when configuring a normal LTI integration
- Go back to the Admin Panel page and select Rest API Integrations
- Click on Create Integration
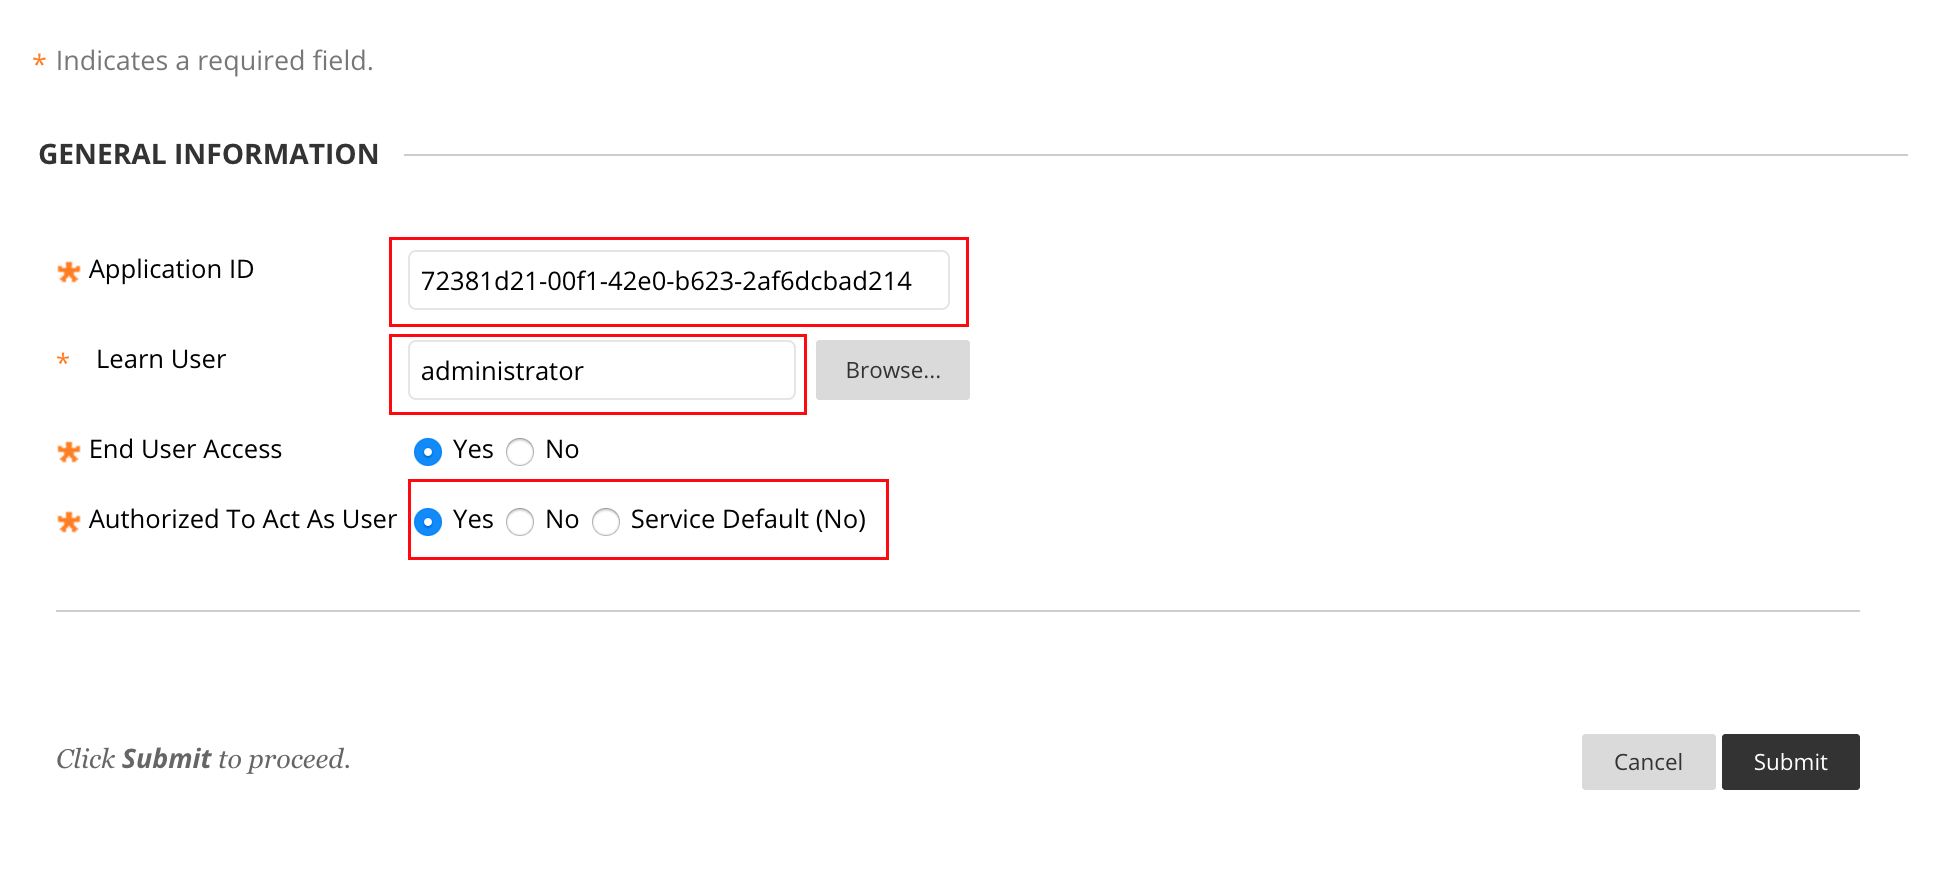
- For the integration you'll need the following information:
- Application ID: should be the value you received after registering the application in DevPortal
- Learn User: the user you want to be defaulted to interact with the integration
- End User Access: Yes
- Authorized To Act As User: Yes
Example Setup
Downloadable Demo Integration: Demo Integration
Integration Workflow

OAuth and LTI Workflow
In order for integrations to send information to Ultra, a few steps within the OAuth and LTI workflow need to be completed:
- Ultra will request for all the registered integrations and will receive a list of the certified integrations
- Ultra will then render an
iframefor each of the integrations in the list - After rendering an
iframefor the provided integrations, each integration will send a redirect request with their respective OAuth2 auth code
// (3) Now, we need to authorize with Learn Ultra using the OAuth2 token that the server negotiated for us
messageChannel.postMessage({
    type: 'authorization:authorize',

    // This token is passed in through integration.ejs
    token: window.__token,
});- The backend will validate that the integration's OAuth2 authorization code is authorized
- Once authorized, the backend will redirect to the integration with the authorization code
- The integration will then provide the secret, authorization code, and exchange to the backend
- The backend will validate the secret and authorization code
- After validating the secret and authorization code, the backend will return the authorization token to the integration
Message Channels
Message channels are used as the primary way for the integration to communicate to Ultra and vice versa. They will be created once the authentication workflow has been completed:
- The integration will send a "hello" message to Ultra
// (1) Send the integration handshake message to Learn Ultra. This notifies Learn Ultra that the integration has loaded and is ready to communicate.
window.parent.postMessage({"type": "integration:hello"}, `${window.__lmsHost}/*`);- Ultra will verify that the integration source matches the one in the rendered
iframe, as well as check to see if the integration has been whitelisted by the user - If the integration is whitelisted, Ultra will create a message channel for the integration to use and send the message channel back to the integration
// Set up the window.postMessage listener for the integration handshake (for step #2)
window.addEventListener("message", onPostMessageReceived, false);

function onPostMessageReceived(evt) {
    if (evt.data.type === 'integration:hello') {
        messageChannel = new LoggedMessageChannel(evt.ports[0]);
        messageChannel.onmessage = onMessageFromUltra;
    }
}

function onMessageFromUltra(message) {
    // (6) On click, route, and hover messages, we will receive an event:event event
    if (message.data.type === 'event:event') {
        // From here, you can do something with those events...
    }
}- The integration can then use the message channel for communicating with Ultra
// (3) Now, we need to authorize with Learn Ultra using the OAuth2 token that the server negotiated for us
messageChannel.postMessage({
type: 'authorization:authorize',
// This token is passed in through integration.ejs
token: window.__token,
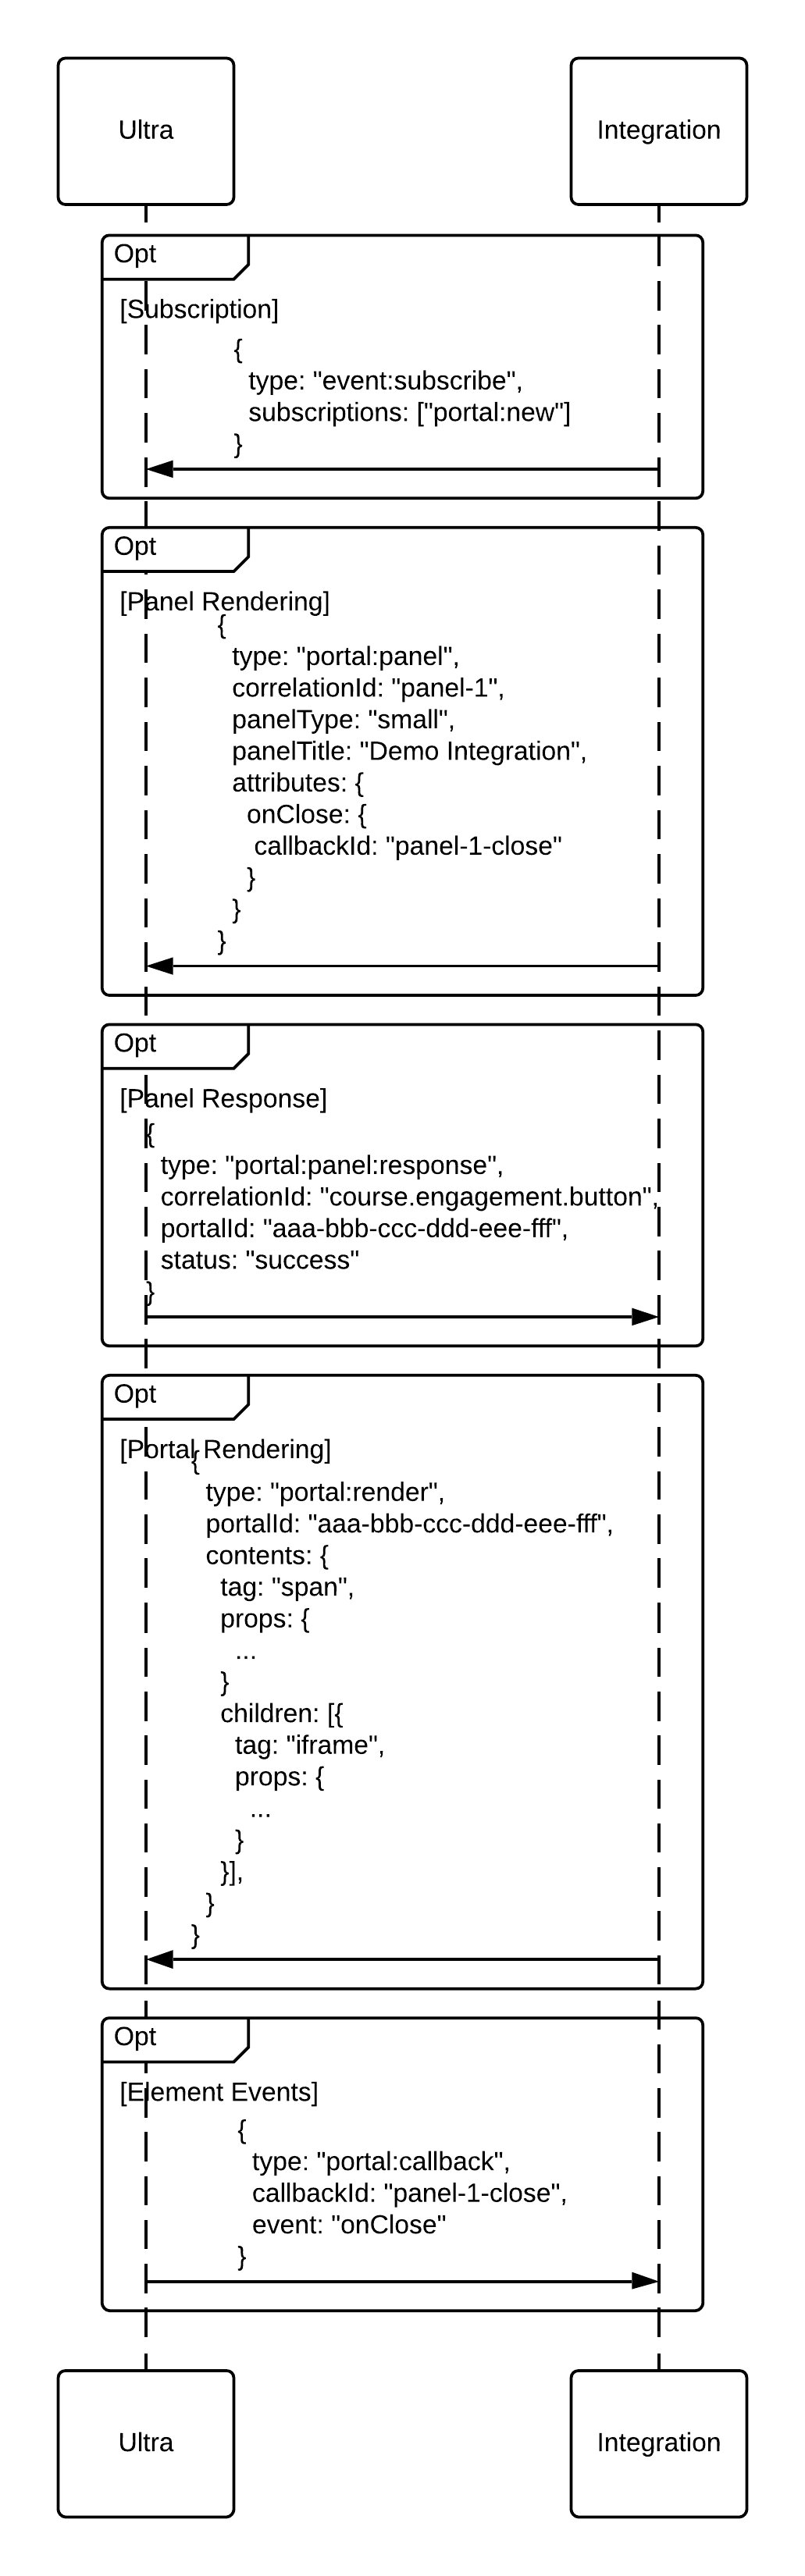
});Portal Workflow
A portal denotes an area that an integration can render content into. Currently, portals are only available in rendered integration panels. Content can be rendered in a portal by following the steps below:
- The integration needs to be subscribed to the
portal:newevent
// (5) Once we are authorized, we can subscribe to events, such as telemetry events
messageChannel.postMessage({
    type: 'event:subscribe',
    subscriptions: ['portal:new'],
});- After subscribing, the integration can send a
portal:panelevent
// (7) For demo purposes, we will open a panel. We send a message to Ultra requesting a panel be opened (if shouldShowPanel is enabled)
messageChannel.postMessage({
    type: 'portal:panel',
    correlationId: 'panel-1',
    panelType: 'small',
    panelTitle: 'Demo Integration',
    attributes: {
        onClose: {
            callbackId: 'panel-1-close',
        },
    },
});- A
portal:panel:responseevent should come back with a generated portalId that can be used to render content into
// In the console from the provided demo, you should see a similar response
{
    type: 'portal:panel:response',
    correlationId: 'panel-1',
    portalId: 'aaa-bbb-ccc-ddd-eee-fff',
    status: 'success',
}- Using the portalId from the previous step, a
portal:renderevent can be sent with the specified content to be rendered
const integrationHost = `${window.location.protocol}//${window.location.hostname}:${window.location.port}`;

// (9) Notify Ultra to render our contents into the panel
if (message.data.correlationId === 'panel-1') {
    panelId = message.data.portalId;
    messageChannel.postMessage({
        type: 'portal:render',
        portalId: message.data.portalId,
        contents: {
            tag: 'span',
            props: {
                style: {
                    display: 'flex',
                    height: '100%',
                    width: '100%',
                    flexDirection: 'column',
                    alignItems: 'stretch',
                    justifyContent: 'stretch',
                },
            },
            children: [{
                tag: 'iframe',
                props: {
                    style: {flex: '1 1 auto'},
                    src: `${integrationHost}/iframe-panel`,
                },
            }]
        },
    });
}- If any attributes have been added on the panel request, Ultra will send the callback event when the specific event is triggered
// In the console from the provided demo, you should see a similar response
{
    type: 'portal:callback',
    callbackId: 'panel-1-close',
    event: 'onClose',
}